Oil stains on driveways, garage floors, or parking spots are not just unsightly — they can also be persistent and surprisingly tricky to remove. Whether it’s from a car oil leak, a spilled container, or even cooking oil accidents, these stains tend to soak deep into porous concrete or asphalt surfaces and leave a lasting mark.
Fortunately, there’s a surprisingly simple and cost-effective solution that many people already have in their homes: baking soda or kitty litter. In this post, we’ll break down why oil stains are tough to remove, why you should remove them, and how you can use these common household items to restore your surface quickly and safely.
🔍 What Is an Oil Stain?
An oil stain is caused when oil — whether from a vehicle, machinery, or other sources — is spilled or leaked onto a surface like concrete or asphalt. These surfaces are porous, which means that the oil doesn’t just sit on top — it soaks into the tiny holes and gaps, making it much more difficult to clean than a surface spill on tile or laminate.
Over time, an untreated oil stain can darken, harden, and even attract more dirt and grime, making it even more noticeable and harder to remove.
❗ Why Is It Important to Remove Oil Stains?
Many people overlook oil stains because they seem harmless. However, leaving them untreated can have a range of consequences:
- Curb appeal: Stains can make your driveway or garage look dirty and neglected, potentially lowering your home’s aesthetic or resale value.
- Surface damage: Over time, oil can degrade concrete or asphalt, causing long-term damage and expensive repairs.
- Slip hazard: Especially on garage floors or sidewalks, oil can create a slippery surface, increasing the risk of falls.
- Environmental concern: Oil can seep into the soil or water systems, posing ecological risks.
In short, dealing with oil stains quickly isn’t just about appearances — it’s also about safety, maintenance, and responsibility.
🧪 Why Are Oil Stains Hard to Remove?
Oil is made up of hydrocarbons, which are water-repelling molecules. That means oil and water don’t mix — so trying to wash away an oil stain with just water is often ineffective.
Additionally:
- Concrete and asphalt are porous, so the oil doesn’t stay on the surface.
- As oil breaks down over time, it bonds more strongly with the material.
- Commercial oil removers can be expensive, harsh on surfaces, or environmentally unfriendly.
That’s why using absorbent materials like baking soda or kitty litter makes such a difference — they work to lift and soak up the oil from within the material before it becomes permanent.
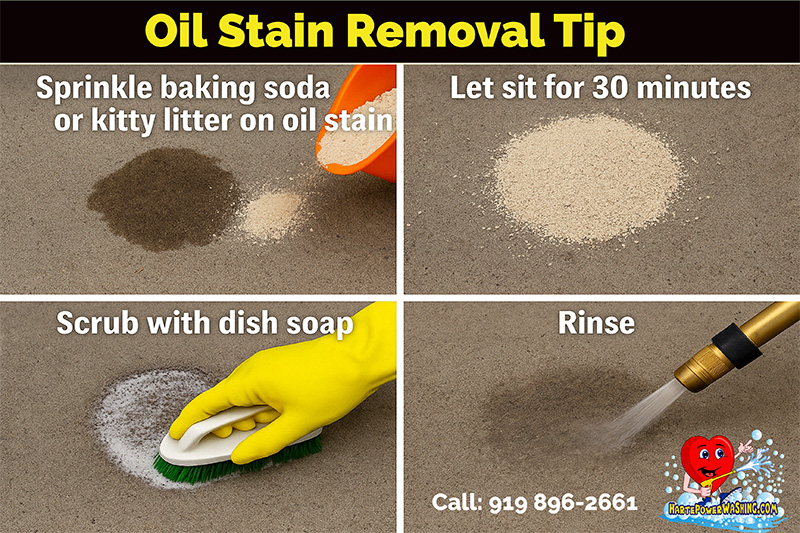
🧽 The Easy DIY Method: Baking Soda or Kitty Litter
This simple method involves just four steps, using items most homeowners already have. Here’s how to do it:
✳️ Step 1: Apply Baking Soda or Kitty Litter
- Generously sprinkle baking soda or clay-based (non-clumping) kitty litter over the oil stain.
- Make sure the stain is completely covered — even a little beyond the edges.
- These materials are naturally absorbent, pulling the oil from the surface and pores.
🕒 Step 2: Let It Sit for 30 Minutes
- Give the baking soda or kitty litter at least 30 minutes to do its job.
- For deeper or older stains, you can let it sit for several hours or overnight.
🧼 Step 3: Scrub with Dish Soap
- After the waiting period, sweep away the baking soda or kitty litter.
- Apply a small amount of degreasing dish soap (like Dawn) to the stained area.
- Use a stiff-bristled brush or broom to scrub the surface in circular motions.
- This breaks up any remaining oil residue and helps lift it out of the material.
🚿 Step 4: Rinse Thoroughly
- Rinse the area with a hose or bucket of water, removing all residue.
- For stubborn spots, repeat the process or use warm water for extra effectiveness.
🟢 Why Baking Soda and Kitty Litter Work
Both baking soda and kitty litter are naturally absorbent materials, but they also offer specific benefits that make them particularly effective:
✅ Baking Soda
- Has natural deodorizing properties, neutralizing smells.
- Gently abrasive, helping to lift oil from textured surfaces.
- Non-toxic and safe for pets, plants, and soil.
✅ Clay-Based Kitty Litter
- Highly absorbent due to its porous clay structure.
- Covers large areas easily and is inexpensive.
- Works well on fresh spills and can even be used preventatively under vehicles.
⭐ Key Benefits of This Method
Here’s why this method is a go-to solution for many homeowners and DIYers:
| Benefit | Description |
| Low cost | Uses everyday materials that are much cheaper than chemical cleaners. |
| Eco-friendly | Avoids the use of harsh chemicals that can harm plants or pollute runoff water. |
| Safe to use | Gentle on surfaces, safe for pets and kids, and easy to handle. |
| Effective on fresh stains | Works best when applied early before oil sets deeply. |
| Quick and easy | Can be done in under an hour with minimal effort. |
🚫 What to Avoid
To get the best results and avoid making the problem worse, keep these tips in mind:
- Don’t use clumping kitty litter — it’s designed to hold moisture, not oil.
- Avoid using high-pressure washers too early, as they can drive oil deeper into the surface.
- If the stain is very old or extensive, you may need to repeat the process or use a commercial degreaser as a backup.
🧼 Final Thoughts
Oil stains might be stubborn, but they’re not invincible — especially when you have household heroes like baking soda and kitty litter in your cleaning toolkit. This simple method is safe, affordable, and surprisingly effective, making it a go-to solution for driveways, garages, and workshop floors.
So the next time you spot that dreaded dark patch under your car, don’t panic — just sprinkle, wait, scrub, and rinse. You’ll be amazed how clean things can get with just a little know-how and some common items from your shelf.